Sunday, December 30, 2007

Domain-Driven or Database-Driven?

Rails' style of domain modeling with ActiveRecord has developers create database migrations that are used to generate database tables and domain models.

Hibernate on the other hand, which is the technology used by Grails, encourages developers to create the domain models first, and then generate a migration for the database (using SchemaUpdate.) The focus of the developer work is on pure domain modeling.

Given that the focus of the ActiveRecord approach is on the structure of the domain models as persisted in the database, I call it Database-Driven. On the other hand, since the Hibernate approach puts the focus on pure domain modeling in the programming language, I call it Domain-Driven.

Is either approach better than the other?

While, it is generally a matter of personal taste, there are potential trade-offs.

Benefits of the Database-Driven approach over the Domain-Driven approach are:
  • Programmers with a DBA background may be more comfortable designing the database first
  • If performance was a typically big concern in the environment due to server limitations or other reasons, the Database-Driven approach reminds programmers to consider performance implications of their model design early


  • On the other hand, benefits of the Domain-Driven approach over the Database-Driven approach are:

  • Since the Database-Driven approach requires programmers to think about things like foreign keys and join tables, which are not related directly to the business domain model, programmers with an OO and Domain-Driven Design background might be more comfortable with the Domain-Driven approach.
  • Programmers who test-drive every line of code, including creation of the domain models, through the application layer (controllers), will be more comfortable with the Domain-Driven approach since the Database-Driven approach may seem distracting with the requirement to write migration code and generate the models amidst the TDD cycle.


  • Which approach do you prefer and why? It would be interesting to learn about other trade-offs between the two approaches.

    Saturday, December 29, 2007

    Code Surgery

    Ever felt the satisfaction of a doctor just finished with an intense surgery. I have... quite often after finishing a particularly broad and complex refactoring. The sense of accomplishment when reviewing the resulting clean code can be quite invigorating.

    This is why I am a big fan of test-driven development. After all, having the code covered by unit-tests provides me with the safety net that enables me to perform the boldest and most effective refactorings possible to achieve clean easy-to-maintain code.

    However, despite having unit-tests, can refactoring get unwieldy? Sometimes, when the code has not been cleaned up for a while and a huge refactoring is necessary. What is one way to prevent that? I'd say, it's the home-cleaning metaphor.

    During my college years, I knew a friend who had a very hard time keeping his apartment clean and tidy. That is because he always pushed the task till later in favor of study or entertainment. It wasn't until his apartment became totally unbearable that he finally cleaned it or asked for help, and by that time, cleaning became an extremely dreadful task.

    I knew another friend who had a very clean and tidy apartment. Cleaning his home was a non-issue because he did it everyday in very small increments whenever something became out of order.

    Code refactoring is very similar in the sense that if it is done in small increments everyday whenever code-smells are noticed, it makes it easy to maintain a clean and tidy code-base.

    What's a good pattern that can help achieve that discipline? The paragraph-summary metaphor. When doing technical writing, authors often begin with a draft, and then refine it incrementally to summarize the content until it is concise and easy to understand.

    This same pattern can be applied with code. Whenever you finish writing a piece of functionality, review it and refactor it to ensure it is DRY, and then repeat the process until you are satisfied with the code structure and cleanliness.

    If you have other suggestions on how to keep a code-base clean through refactoring, please share in the comments area.

    Thursday, December 27, 2007

    Glimmer's built-in data-binding syntax

    In my previous post Data-Shining in Glimmer, I introduced one method of data-binding following this syntax:

    [widget, :widget_property] <=> [model, :model_property]

    In this post, I will talk about another way to do data-binding, which may feel more natural to some programmers and offer some advantages over the syntax above.

    To avoid confusion, I will dub the data-binding mini-DSL shown above Shine, and I will call the syntax that I am about to demonstrate Glimmer's built-in data-binding syntax.

    Here is a Login window example following the Model-View-Presenter pattern:

    class LoginPresenter
      attr_accessor :user_name
      attr_accessor :password
      attr_accessor :logged_out

      def initialize
        @user_name = ""
        @password = ""
        @logged_out = true
      end

      def login
        self.user_name = ""
        self.password = ""
        self.logged_out = false
      end
    end

    login_presenter = LoginPresenter.new

    login_shell = shell {
      text "Login"
      composite {
        layout GridLayout.new(2, false)

        label { text "Username:" }
        text {
          text bind(login_presenter, :user_name)
          enabled bind(login_presenter, :logged_out)
        }

        label { text "Password:" }
        text(SWT::PASSWORD | SWT::BORDER) {
          text bind(login_presenter, :password)
          enabled bind(login_presenter, :logged_out)
        }

        button {
          text "Login"
          enabled bind(login_presenter, :logged_out)
          on_widget_selected { login_presenter.login }
        }
      }
    }

    login_shell.open

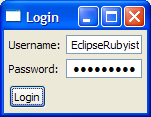
    Here is a screenshot of the UI before logging in:


    Here is a screenshot of the UI after loggin in:


    As you can see, the LoginPresenter abstracts all of the presentation logic in a model, containing the username, password, and logged_in attributes. The view, written with Glimmer's syntax, is data-bound to the presenter.

    For example, "text bind(login_presenter, :user_name)" indicates that the text of the username textbox on the screen is data-bound to the user_name property on the login_presenter model. When the user enters text into the text box, it gets automatically stored in the model. Later, when pressing the Login button, the listener fires the model login method, which has access to all the data the user entered, and can do all the work within the model.

    Another example is "enabled bind(login_presenter, :logged_out)" on the Login button, which binds the enablement of the button to whether the user is logged in or not.

    What is so nice about data-binding in general is that you can test-drive presentation logic easily without dependencies on the widgets and without any awareness of how information is visually layed out on the screen, so layout can vary independently.

    Here is how to data-bind following the Shine mini-DSL introduced in my last post about Glimmer:

    login_shell = shell {
      text "Login"
      composite {
        layout GridLayout.new(2, false)

        label { text "Username:" }
        @username_text = text { }

        label { text "Password:" }
        @password_text = text(SWT::PASSWORD | SWT::BORDER) { }

        @login_button = button {
          text "Login"
          on_widget_selected { login_presenter.login }
        }
      }
    }
    [@username_text, :text]<=>[@login_presenter, :user_name]
    [@username_text, :enabled]<=>[@login_presenter, :logged_out]
    [@password_text, :text]<=>[@login_presenter, :password]
    [@password_text, :enabled]<=>[@login_presenter, :logged_out]
    [@login_button, :enabled]<=>[@login_presenter, :logged_out]

    login_shell.open

    Which method to use?

    While this largely depends on personal preference, there are a few potential trade-offs.

    Here are the advantages that Shine offers over Glimmer's built-in data-binding syntax:

  • View syntax is focused on layout concerns only
  • Having the data-binding logic decoupled from the view allows you to reuse the same view with different data-binding scenarios


  • Here are the advantages that Glimmer's built-in data-binding syntax offers over Shine:

  • May be easier for some to think about and define data-binding while in the process of laying out widgets
  • Having data-binding code mixed in with widget declarations makes it easier to later spot and maintain data-bindings for the widgets they are tied to


  • In either case, data-binding greatly facilitates following the MVP architectural pattern to write easy-to-maintain testable code for desktop applications.

    Stay tuned for more on how to benefit from the MVP pattern when building SWT applications with Glimmer.

    Friday, December 21, 2007

    Music to my ears

    It was wonderful to hear one of my colleagues the other day correct another programmer she was pairing with by saying "First run the tests and see that all the assertions are succeeding before you make any changes."

    It was music to my ears because only two days prior, I was pairing with that colleague, and demonstrating how important it was to avoid refactoring until all tests are green.

    Not only does knowing that you are making a difference feels great, but it also motivates you to contribute even more to the team you work with.

    Wednesday, December 19, 2007

    Data-Shining in Glimmer

    If you take a Ruby gemstone and shine light on one of its facets, you get a glimmer of the same light from the other facets. This is similar to how data-binding works. When the user inputs data into one of the data-bound fields in a user-interface, you end up getting the same data from the other side of the binding whether it is a domain model property or some other field in the user-interface.

    I attribute most of my knowledge on data-binding technology to fellow friend and past project colleague David Orme. Not only is he the founder and one of the original contributers to the JFace Data-Binding framework, but he also helped create and develop the Eclipse Visual Editor project and popularized the idea of duck-typing in Java.

    During the days when he and I pair-programmed on an Eclipse RCP project for a client, we used to dream about simplifying the data-binding syntax we relied on, which looked like this at the time:

    dbc.bind(nameTextBox, new Property(person, "name"), null);
    dbc.bind(ageSpinner, new Property(person, "age"), null);

    We fantasized about having a DSL like this one:

    (nameTextBox, text) <=> (person, name)
    (ageSpinner, selection) <=> (person, age)

    Well, I am very happy to announce that this has finally become a reality in Glimmer with the power and flexibility of the Ruby language. Here is how it looks like in Glimmer:

    [@name_text_box, :text] <=> [@person, :name]
    [@age_spinner, :selection] <=> [@person, :age]

    Amazing, isn't it!!!

    The spaceship operator <=> clearly represents two-way data-binding at work. For example, the text value of the name_text_box is data-bound to the name property on the person model, so whenever the user enters text in the text box, data is automatically copied to the name property in person, and whenever the name property is programmatically changed, data is automatically copied to the text box and displayed on the screen.

    I demonstrated in my last post how Glimmer Listens to SWT events, which can help you bind user actions such as pressing a button to application actions like logging in. Data-binding on the other hand greatly simplifies synchronization of data between the user-interface and domain-models, making it readily available for use when the user performs an action. By relying on listeners and data-binding, one can follow the Model-View-Presenter pattern by placing presentation logic in a presenter model, making it very easy to maintain and cover with unit tests.

    Stay tuned for my next post where I will introduce a second method for data-binding in Glimmer and contrast both ways of doing it.

    Monday, December 17, 2007

    Glimmer Listens

    [updated as per Chauk-Mean's suggestion to have listener syntax follow the Ruby style convention]

    In Glimmering Philosophy, I went over Glimmer's design principles, and the basics of how it works to simplify SWT development. Here, I will explain how to attach event listeners to SWT widgets using Glimmer's simplified syntax.

    First, let's go over how to do so in Java. We usually call an add***Listener method on the widget and pass it a listener implementation, which is invoked whenever the widget encounters an event of a particular type.

    For example, in order to have the user login everytime a Login button is pushed, we can write Java code like this:

    Button button = new Button(composite, SWT.PUSH);
    button.setText("Login");
    button.addSelectionListener(new SelectionAdapter() {
      public void widgetSelected(SelectionEvent e) {
        user.login();
      }
    });

    The listener implementation is an anonymous class extending SelectionAdapter, which implements the expected SelectionListener interface:

    public interface SelectionListener extends SWTEventListener {
      public void widgetSelected(SelectionEvent e);
      public void widgetDefaultSelected(SelectionEvent e);
    }

    Once the Login Button is pushed, a SelectionEvent is generated and passed to the widgetSelected method, which is invoked on the SelectionListener implemention.

    If you notice, widgetDefaultSelected was not implemented in this case as we were not interested in that event. We placed our logic in a code block representing the widgetSelected implementation instead, so this is the minimum information needed to accomplish the task. Based on Glimmer's Philosophy, that is all we need to attach a listener, so with Glimmer's syntax, here is how to attach a listener:

    button {
      text "Login"
      on_widget_selected { user.login }
    }

    By declaring on_widget_selected, we indicate that we would like to implement the widgetSelected method, which exists only on one of the listeners supported by the Button widget. Based on that minimum amount of information needed, Glimmer automatically figures out which listener to implement (SelectionListener), plugs our code block { user.login } into an anonymous implementation of it, and then attaches the listener to the widget using the correct add***Listener method (addSelectionListener).

    Glimmer's syntax bypasses the need to implement an interface as it only needs a code block and the name of the event we care about. Here is another example:

    text {
      on_focus_lost { user.save }
    }

    This saves the user object whenever the text widget loses focus (e.g. tabbing out)

    The listener that was implemented automatically by Glimmer is FocusListener:

    public interface FocusListener extends SWTEventListener {
      public void focusGained(FocusEvent e);
      public void focusLost(FocusEvent e);
    }

    Note that the block of code that follows the listener declaration in Glimmer is a standard Ruby block, meaning it can optionally receive parameters if need be. In the case of listeners, the only parameter we sometimes care about is the event object. Here is an example that benefits from the optional event parameter:

    text {
      on_verify_text {|verify_event| print verify_event.text }
    }

    Glimmer's concise syntax requires us to enter only the minimum information needed to attach listeners, not requiring us to include the event parameter unless it truly becomes part of the minimum information needed to accomplish the task as demonstrated in the last example.

    In my next Glimmer post, I will introduce data-binding support in Glimmer, which easily enables two-way synchronization between SWT widgets and domain model properties.

    Wednesday, December 12, 2007

    Wednesday, December 05, 2007

    Validation Bubbles

    Over the last week, I have cooked a mini-framework on top of Struts at a client site to facilitate development in a domain-driven way inspired by the Naked Objects approach. This was done by benefiting from the latest features in Hibernate 3, which are utilized in the JBoss Seam web framework.

    Validations were defined on domain model fields using Hibernate Annotations, such as @NotEmpty, @Email, and @Regex. Based on these annotations, database tables were generated automatically using the hbm2ddl tool, and validations were performed automatically utilizing a technique that I like to call Validation Bubbles.

    How do Validation Bubbles work?

    Whenever a model is saved, it validates itself (using the Hibernate validation framework.) If errors are found, they are wrapped and thrown in a validation exception, which bubbles up from the domain model layer to the application layer. At that point, the exception is caught by a custom Struts action super-class that stores validation messages as a request attribute. When the JSP page is being rendered, a custom JSP tag picks the validation messages from the request and renders them on the web page to the user.

    What benefit do we get from Validation Bubbles?

    The application layer gets cleaned up quite a bit as Struts actions do not need to invoke validation explicitly anymore. As long as a Struts action extends the custom Struts super-class that catches bubbled validation exceptions, its logic only needs to handle orchestrating the business use-case.

    Additionally, by placing business validation rules on domain models, and generating the database tables and page-level validations from them automatically, we eliminate redundancy as we do not need to define the same validation rules in multiple places anymore.

    Now, it would be cool if we can somehow additionally generate client-side javascript validations from the Hibernate annotations on the domain models. That will be my next endeavor.

    Tuesday, December 04, 2007

    EclipseWorld 2007 Blog Posts

    Took me a while, but finally finished my blog posts about EclipseWorld 2007. I will post again soon with links to my presentation slides including answers to the questions and challenges I asked attendees during my presentation "Practical Design Patterns for Rich Client Applications."

    Here are the posts:
    EclipseWorld 2007 Day 1
    EclipseWorld 2007 Day 2
    EclipseWorld 2007 Day 3

    Monday, December 03, 2007

    HAML is to RHTML what JSTL was to JSP

    Ok the title was full of acronyms, but if you're familiar with two of them, that'd be more than enough.

    JSTL closed the abstraction gap between JSP and Java code by allowing developers to write Java logic in XML... Yuck!!!

    HAML on the other hand accomplished the same goal for RHTML and Ruby code by allowing developers to write RHTML in Ruby... Yumm!!!

    Ok, that is not entirely true, but it is close enough. HAML is a DSL not directly based on the Ruby language as it does rely on a compiler to process its syntax. Still, it is very DRY, tidy, and easy on the eyes compared to RHTML. Check out the HAML/RHTML showdown on HAML's home page for a good demo of that.

    If you're already utilizing HAML on a project, please share your experience with us. I'd be curious to know if it's a TKO against the likes of XHTML, RHTML, and JSP.

    Saturday, December 01, 2007

    Glimmer Attention

    Here are two blog posts that mention Glimmer: